Homemade Apple Cider
How to Make Apple Cider at Home

We had a great apple year in the apple orchard. And great apples mean great homemade apple cider!
When we purchased our property, we didn’t even know all the hidden gems that we would find on our 40 acres! And one of those gems was lots of apple trees! But because it was so grown in, we really haven’t had excellent apples until this year.
A couple of years ago, Jason was able to clear out most of the extra brush and trimmed the apple trees. And last year we did not have a good year with apples, with the trees hardly producing at all! But we totally lucked out this year!
As an Amazon Associate, I earn from qualifying purchases. You can see my full disclaimer for more details.
Collecting Apples for Homemade Apple Cider
In past years, we make picking apples a family outing of sorts. This year, having a baby definitely puts a little cramp in that. But the kids and Dad had a great time picking up apples in the apple orchard for making DIY apple cider.
Apple cider does not require the best-looking apples to have a successful year. We are able to use the bruised apples for apple cider too, which makes it great so we don’t waste any apples!
Making Apple Cider at Home
There are so many ways to crush the apples before putting them in the DIY apple cider press, but the easiest (and cheapest) way that we have found is using a sledgehammer. This year we attempted to use a garbage disposal to crush the apples, but that process actually took longer than using the sledgehammer.

After smashing the apples, we poured them into a new and clean 5-gallon bucket that is lined with a mesh bag. Here are the mesh bags that we purchased. We then used this shop press to press the apples down and collected the cider in another clean 5-gallon bucket.
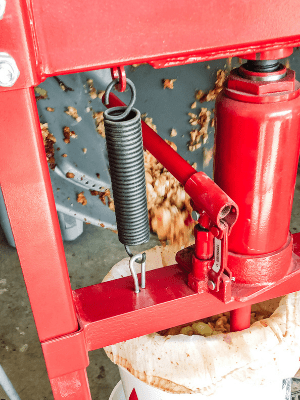
As you can see in our setup, we have buckets on either side of the tin pan to catch all of the drain-off.
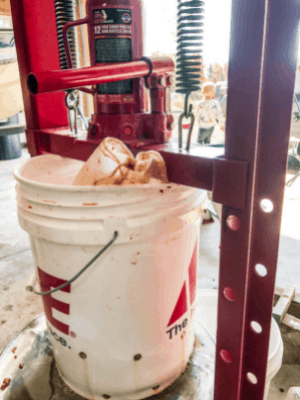
In this setup we have the shop press, a round pizza pan with a hole cut in it, a mesh bag inside a 5-gallon bucket with holes drilled into the bucket and two more 5-gallon buckets to catch the run off cider.

How to Store Freshly Made Apple Cider
After pressing the apple cider, we strained the cider with a small strainer. This is just an extra precaution to make sure that there are no bits of apple left in the cider.
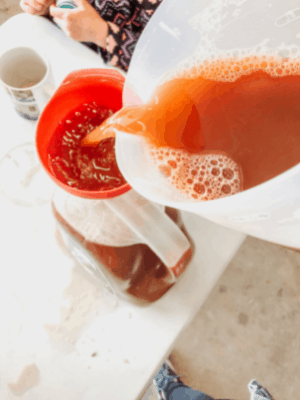
We then transferred the cider into juice containers that we have saved and washed from the past year or so. (We don’t drink a lot of juice in our household, so it took us a long time to save up the juice containers!). After making sure to leave a little space at the top, we put the juice containers in our freezer for storage.

We are looking forward to pulling out Homemade Apple Cider occasionally for an extra special fall snack all year long!

Shop the Post
[show_shopthepost_widget id=”4584067″]